Showing posts with label DIY. Show all posts

Monday, June 18

Father's Day

I didn't know what I would be getting Adam for his first father's day. For mother's day I got flowers and a pint of ice cream (a few days early- the flowers died before mother's day and there was something wrong with the ice cream- like it melted then re-froze before I even peeled off the plastic liner under the lid). So I knew Adam wasn't going to expect anything really big or expensive. I was going to make a shutterfly book since i had a free promo code- but I don't have enough pictures to make it worth it- maybe next year)
I finally decided on something that had been floating around pinterest for a while.

A Salt-Dough keepsake of Kate's foot.
*not Kate's foot*
I had heard of salt dough ornaments before, but never tried to make any. The recipe is from here, though I needed to add more water.

I wanted to make an impression of her hand, but being 2 months old Kate's hand is basically in a permanent fist. So I went with her foot. Which was much harder to do than I thought. Push too hard- squished blobby toes that look like she is swollen (or has hobbit feet). Push lightly- no clear impression.
When I finally got it right, I put it into the toaster oven. I found out my toaster oven will only cook for 2hrs at a time, so I needed to go back and add another hour to the baking time.
 I painted the inside and added her name and the year. Adam declared it 'cute' and can take it into work.

We spent the day at my parents' and Kate did pretty well with her naps. My only request was to have a picture taken of us all together.

 Happy Father's Day!

Thursday, November 3

Nursery Art Finds a Home

Remember the prints I framed for the nursery?

I finally hung them in baby Stybs' room.

I actually don't mind that they are all looking in the same direction now that they are up on the wall.

I'm excited that I'm actually making progress on the nursery!

Tuesday, November 1

This One Too?

Yet another curtain has fallen down because the screws came out of the wall.


I am blaming this one on Grover. He loves this room and if those little scratches under the window tell me anything it's that he tries to get up into the window to stare/ chirp at birds and squirrels.

Well I needed to shorten those curtains anyway (floor length curtains and baby that will eventually crawl and inevitably grab those curtains is not safe). So after fixing the rod (by trying 2 sets of longer screws, anchors, and finally moving the bracket about a 1/2 inch to the right) I started working on hemming the curtains. I don't have a sewing machine, and I'm not that great at sewing anyway, so I got out the hemming tape that has been sitting in my closet for a while.

But before the hemming process started, I flipped the curtains upside-down, so they will no longer be tab-top curtains. I just opened up the seams from the hem at the bottom to create the new pocket for the rod to slide into.
I don't have a seam ripper in my little sewing kit, but an exacto-knife works well too!


Once they were hanging the correct way, I pinned where I wanted the bottom of the curtain to be.

Making sure they were even, I took the first set down. I followed the directions on the package for the hemming tape, and it's really easy to use. As long as you make sure you hem the correct side.
I forgot to check which part of the curtain I was cutting off, and of course, cut the wrong side! Ugh. One curtain ruined. Luckily one of the windows is narrow so it's not a huge deal, but I felt like an idiot!

On the correct panels, I started by ironing the bottom to get a good crease in the fabric. Then I cut about 3 inches from crease, folded that to make a hem, and ironed again. Once the fabric had nice crease lines, I knew where to put the hemming tape and just ironed away.
much safer for baby stybs

Again, it's very easy to use, as long as you are hemming the right side of the fabric!

Monday, October 31

I Finally Did It!

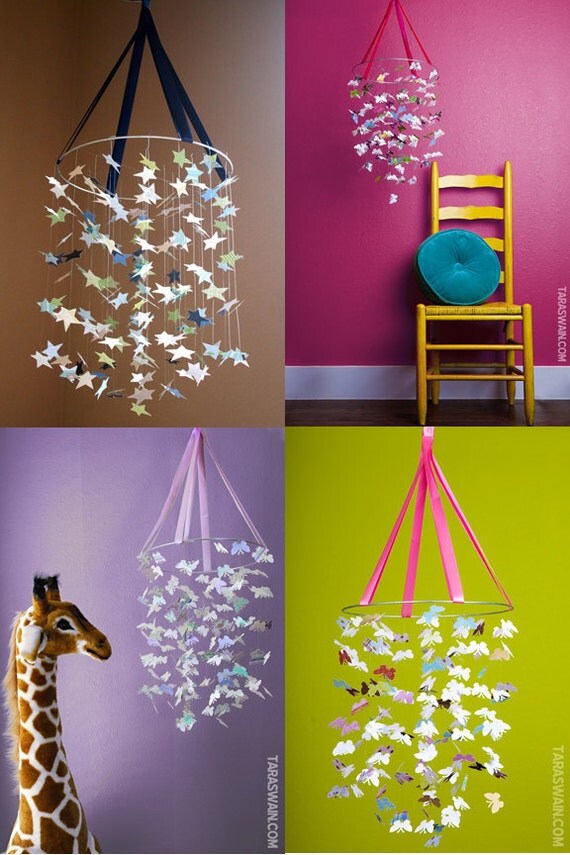
As we all know, Pinterest is highly addictive. I have been eying-up this mobile for a while, it was one of the first pins I made.
originally from here
And of course the millions of  pictures with how-to's that followed made me believe I could make one too.
originally from here
But it was definitely this last picture that made me want SO BAD to make one for baby Stybs.
also originally from here
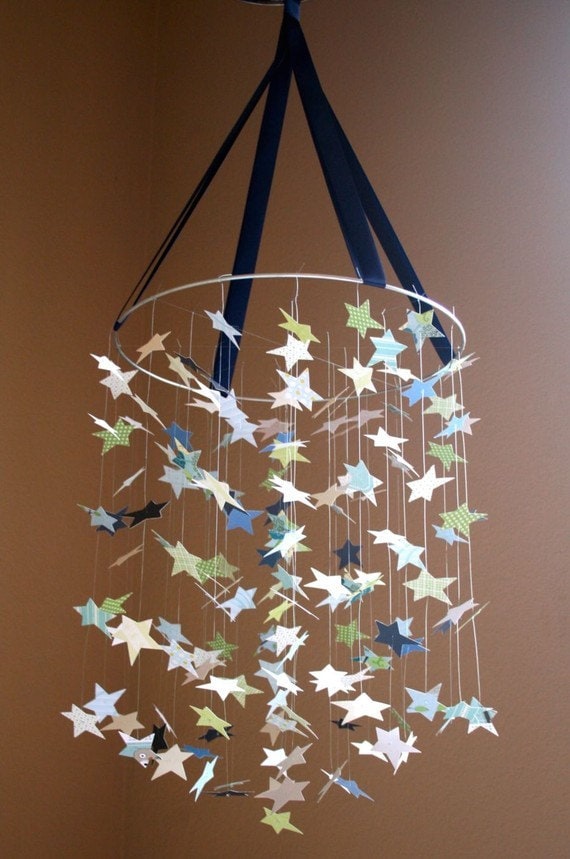
Not the normal circles! So cute! I have to keep it gender neutral (b/c we won't be finding out the sex of babyS) so those cute butterflies were out. But stars, now that could definitely work. So after many busy weekends where I never made it to the store to buy materials I finally did it.

I decided to use scrapbook paper instead of the paint chips that most of the tutorials used. While the paint chips are free, they are only one sided and I knew that you would see both sides of the stars once they were hanging. Card stock is heavy weight like paint chips, but it has color on both sides of the paper.

I picked up 4 sheets of solid colors, along with a cute little duck print paper that coordinated. I got a wooden embroidery hoop (to use the inside ring) and a star punch for under $20 total (gotta love bonus coupons!). I already had string, double sided tape, and ribbon at home.
It's hard to tell, but the solid colors have a sheen to them, so they reflect a lot of light


I began by punching out hundreds of stars. I don't actually know how many I punched, and I didn't use them all, but it felt like 100.

Then I needed to decide on the way the colors would hang. I could have gone with a random look like the star mobile above, but I really liked the gradation from that original mobile I pinned so I played around with how it could look.


When I finally settled on the pattern I got to taping the stars onto the string. I was happy with it.
until I held it up and saw that it twisted around and you could see the tape. How could I forget that you would see tape? So I pulled out the double sided tape and got to sticking the same colors on the back of each star.

Now when it hangs it can twist all it wants and still looks cute.

To shorten up the process that took me 2 hrs, I'll just jump to the after picture:
I love the way it reflects light. It almost sparkles!

I painted the hoop white, made 6 strings of the original pattern, and 4 more without ducks for the inside. I tied the ribbon onto 4 points and it's now ready for the nursery!

I'm so happy I finally made this mobile, now to tackle some more pinned ideas.

Monday, October 24

Free & Easy Art for the Nursery

It's been hard on me trying to think about what kind of artwork I will make for baby stybs. Since we won't be finding out the sex, I can't paint its name or even initial. I don't want to make anything too girly or masculine either. So while I contemplate what to make I put something together that should totally work for baby.

I started with three frames I had in the basement guestroom (which isn't used much, so they won't be missed).
And I selected some art from the book "Creature", which Adam was given a while back. It was just collecting dust under our coffee table, and I got the OK from Adam to cut out some of the pictures.
The book is filled with amazing photographs of various animals (and bugs- eww). Not all of them would be appropriate for a nursery:
Heelllloooooo Mr. Monkey!
And not all of the pictures were the right size for the frames:
cute tiger cub was just too big :(
But I selected three that all work together: zebra, lion, and giraffe.
I'm not too happy that the animals are all facing the same way. It's like they're in a Beyonce video (to the left, to the left...) but Adam thinks it'll be ok. Once we get them hung on the wall, with other art/ accessories in the room, I'm sure it won't bother me anymore.

Saturday, October 8

Pinterest Challenge #1

 My friend Jen, from Home for Three, linked up to a Pinterest challenge. I've seen these challenges before and I have been inspired to do a lot of things I have seen on Pinterest. Most of these were for my classroom, and I do not have pictures of them. So, since I just resumed blogging this week, and since I saw the actual challenge on pinterest, I wondered if blogging about the challenge would qualify as my first pinterest inspired project.


Hey, why not? Challenge Accepted.

But to cover my butt as far as actually sharing what projects I have tried, I'll leave you with the two I had documented.


And my first ever Pinterest inspired project:

I feel as though I've said Pinterest about a million times in this post. So I'll leave you with one more:
Follow me on Pinterest, here. Follow Me on Pinterest

Tuesday, April 26

Ready For A Picnic

We got this picnic table form my friend Liz's mom last year. It was in need of some fresh paint. So I took some time during Spring Break and got to work. I used my mom's little sander, then painted the table a fresh red. I can't wait to use it this spring/summer, especially at our annual crabfest!
before
after
Oh, and I used the left over paint to paint the front door. I had wanted to paint it red for a while, so this was the perfect time. It took four coats of paint... and I still think it could use one more.


But I think the table and the door are the perfect shade of red.

Wednesday, April 20

Office Paintings

After completing the gallery wall in my office, I needed to turn my attention to the two canvases above the love seat. The have been hanging half- completed for months.
I hung them way back in December
the preliminary ideas
Well I finally finished them. Though I don't know if I will ever think of them as completely finished- I guess it is an artistic thing, always finding something wrong with it, thinking of ways to add to it or change it. But for now they are done.
The general pattern came from one of the pillows that I had, and I even used the wall paint as a little detail. I think they go well in my office and, for now, I am happy with them.
I really like painting and can sit for hours on one piece. I just need more inspiration... got any?

Monday, March 14

Dirty Little Secret

I have something to confess... we have a shower leak.. and we were still using the shower...until last week when the leak finally broke through the ceiling and a stream of water poured through.
the water stained ceiling
So Adam and I started by moving the TV and taking down the shelving in order to open the ceiling.
With Grover looking on as the foreman
Once everything was cleared out, we Adam was able to take down the ceiling drywall- that was only held up by 4 nails... oh lordy...
Then it was time to run water in the shower to figure out where the leak was. I was afraid it was coming from a hole in the pipe and that it would be an expensive fix.
So I turned on the shower and we waited... and waited... and waited...

See, the reason we hadn't addressed the leak up until this point is that there was no water coming through the ceiling, and the water stain hadn't really grown. So Adam stayed downstairs, I was upstairs in the bedroom by the access panel, and I finally saw water.

Very slowly, drop by drop, water was coming from the center pipe behind the shower.
After we turned off the water, and went to look and see where it might be coming from, I found what was possibly the source of the leak, the tub faucet- which had no caulking around it (it must have come off?) and there was a gap between that and the tile.
Adam stood behind it at the access panel and I got to wiping it down with some bleach solution. As I pushed the sponge around faucet Adam could see the bleach bubbles dripping down the pipe.

You have no idea how relieved I was to find that this would be the source of the problem. Since we already have some clear silicone to caulk around the faucet, this is a free fix. No expensive plumber needed. We will have to replace the drywall from the ceiling (there was some mold obviously) but that is something we would have had to do anyway.

So now we wait for the shower to dry out, then Adam will caulk it with the silicone, then we can test it again to make sure no more water is coming through.